Our little house tour and giant candy tutorial has to be pushed to later this week, but I promise to post it this weekend. In the meantime – enjoy one of my favorite homemade ornaments to create!
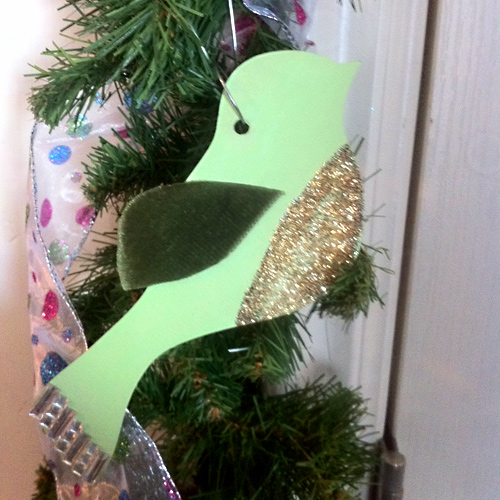
supplies
- chipboard bird blank (this is from maya road)
- paint
- glitter (german glass glitter)
- glue
- bits of ribbon, old book pages, jewels
1. begin by painting the chipboard and allow to dry. you can also start with cardstock, but be sure to layer a couple sheets together to make it more sturdy.
2. brush on glue and glitter the bird’s crest and and beak.
3. add jewels or more glitter to the tail, and cut a simple wing from book paper or ribbon.
NOTE: For these birds I love to use the true german glass glitter. As the birds age the glitter gets a beautiful patina. And when hung in your tree, the surrounding lights will shimmer beautifully!
GIVEAWAY ALERT
EVEN MORE genuine german glass glitter is up for grabs! Leave a comment and you will be entered to win one of TWO samplers. Winners announced this weekend.

As I mentioned in my most recent spot on Paperclipping Roundtable, I have been working on some ginormous deco pieces that even Elf himself would be proud of! Here is the first in that series. These giant snowflakes are really simple to make. The whole project only took about 20 min. from start to finish. {I will share a photo of his in place next week when I post my Holiday tour of my home!} And don’t miss the details of the latest GIVEAWAY at the end of this post!
supplies
- foam core (got mine at Walmart for under $3)
- pattern
- sharp craft knife
- spray adhesive [Scotch Super 77 or other brand]
- glitter* [for this project I used German glass glitter since I know that I will be keeping it from year to year]
[click to continue…]
Welcome to Handmade Holiday 2010. Everyday for the next 3 weeks, join me for DAILY Holiday inspiration, freebies, and of course plenty of giveaways! I know how busy this season can be, so every project you will find here will be quick and easy. (but still fabulous of course) Be sure to check back each day for your chance to win a fantastic prize.

Materials: Die Cut (Sizzix round ornament 3D – currently on sale!), flake glitter (Martha Stewart Crafts – available at Michael’s), button and crepe paper (Jenni Bowlin).
Begin by cutting out the ornament. I used my Sizzix and cut the blanks from mat board for extra sturdiness. You could also cut cardstock by hand and adhere a few layers together for added stiffness.
Working on one side, brush adhesive on the surface of the ornament. While still wet, sprinkle with the glitter flakes. Shake off the excess glitter and repeat with the other side.
Gather the crepe paper into a small rosette and staple to secure. Remove the foam adhesive from the back of the button (if using Jenni Bowlin) and glue the button to the center of the rosette with hot glue. Glue the rosette to the top of the ornament.
And be sure to leave a comment for a chance to win today’s prize. One lucky winner will receive a glitter sampler from Martha Stewart. We will even throw in some pre-cut shapes so you can get started making your own ornaments right away.

I love to take journaling cards and make them into an almost instant minibook. I am especially excited when the cards are as cute as these from Echo Park Paper.

One of my favorite things in the Summertime line, is the scallop border stickers. If you look closely.. the scallops are imperfect -they wonderfully un-even. Giving them a unique little touch of casual whimsy. The make the perfect edge treatment for my pages. But what to do about their unsightly sticky back?

You could cover the back with paper and trim around it.. but that is way too much work. lol So I look to the cure all in my crafting tool kit… GLITTER!

Just sprinkle your favorite glitter on the exposed sticky…

And you have a perfectly finished edge on BOTH sides of the page!

Swing by the Echo Park Paper Facebook Page for more fun ideas and to see the entire line.
This last weekend, my little sister Lea had a booth at the Utah Women’s expo. It was a blast…
I got to help her out the best way I knew how… by creating some glittery goodness for the booth, and help with designing the her business materials. I love how it all turned out, and most of all… so did she!


 A few weeks ago was my dear nephew’s First birthday party. In true Cabrera style, it was an event to behold! Mom was in charge of cooking, and cooked for a week! Lea bought the best of everything for her little prince, and I… did the decorations. As you can see, I was very inspired by what I saw at CHA just a few days before the party. Specifically what I saw at the Girls Paperie booth! Margie and her team worked MAGIC. I was just a little sad that her line wouldn’t be ready for my party. (but there is always a Cabrera party around the corner!)

This banner greated guests in our main party area. Since I had very little time to get all the decorations done. To put it together was pretty simple. I started with some premade chipboard letters by Making Memories. I covered them in real German Glass Glitter. (Meyer Imports)

To finish, I adhered die cut scalloped circles to vintage book papers, then adhered the letters. I ripped the bottom of the book papers and strung up the whole thing with ribbon.
For the bows, I used vintage sewing pattern paper. To create..
Create a paper rossette. (great instruction can be found at Paper Source) and set aside.
Cover a chipboard circle with a scallop circle cut from patterened paper of your choice.
But the sewing pattern paper into long strips, and loop into a bow like shape. Use craft wire to “tie” together. Hot glue the rossette to the bow. Glue the chipboard to the center of the rossette, and add a glittered monogram.

I used the same technique to create this rossette. I simply adhered it to a long wooden dowel.